Ultrasonic Testing (UT)
DETECTABLE DEFECTS IN COMPOSITE STRUCTURES
- Presence and type of delaminations.
- Presence of voids between fibres.
- Correct bonding of parts.
- Uniformity of laminate thickness.
- Fibre compaction.
- Uniformity of mechanical properties of structures.
- Possible inclusions of extraneous material in laminate.
- . . .
ADVANTAGES
- Non destructive method.
- Extensive analyses of the structure.
- Objective data (physical properties).
- Easy-to-handle instruments and devices.
- Analyses on metallic and composite structures.
A BEGINNER’S GUIDE TO ULTRASOUNDS
What is Ultrasound?
Sound generated above the human hearing range (typically 20KHz) is called ultrasound. Ultrasound behaves in a similar way to audible sound but, since it has a shorter wavelength, it can be reflected off very small surfaces, such as defects located inside materials. This is the property that makes ultrasound useful for non destructive testing of materials. Ultrasonic non destructive testing and thickness gaging commonly employ a frequency ranging between 100KHz and 50MHz.
Frequency, period and Wavelength
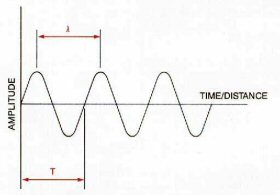
Ultrasonic vibrations travel in the form of a wave, similar to the way light travels. However, unlike light waves, which can travel in vacuum (empty space), ultrasound requires an elastic medium such as a liquid or a solid. Shown in Figure 1 are the basic parameters of a continuous wave. These parameters include the wavelength (λ) and the period (T) of a complete cycle.

The number of cycles completed in one second is called frequency (f ) and is measured in Hertz (Hz), some examples follow:
- 1 cycle/second = 1Hz
- 1000 cycles/second = 1KHz
- 1000000 cycles/second = 1MHz
The time required to complete a full cycle is the period (T), measured in seconds. The relation between frequency and period in a continuous wave is:
The velocity of ultrasound (c) in a perfectly elastic material at a given temperature and pressure is constant. The relation between c, f,λ and T is:
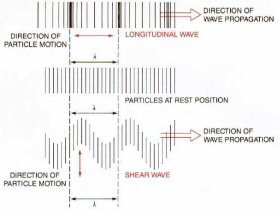
The most common methods of ultrasonic examination utilize either longitudinal waves or shear waves. Other forms of sound propagation exist, including surface waves and Lamb waves.
The longitudinal wave is a compressional wave in which the particle motion is in the same direction of the propagation.
In the shear wave the particle motion is perpendicular to the direction of the propagation.
Surface (Rayleigh) waves have an elliptical particle motion and travel across the surface of a material. Their velocity is approximately 90% of the shear wave velocity of the material and their depth of penetration is approximately equal to one wavelength.

Plate (Lamb) waves have a complex vibration occurring in materials where thickness is less than the wavelength of ultrasound introduced into it.
Figure 2 provides an illustration of the particle motion versus the direction of wave propagation for longitudinal waves and shear waves.
Applying Ultrasound
Ultrasonic non destructive testing introduces high frequency sound waves into a test object to obtain information about the object without altering or damaging it. The basic quantity measured in ultrasound testing is the time of flight or the amount of time for the sound to travel trhough the sample. Based on velocity (c) and round trip time of flight trhough the material (ts), the material thickness (t) can be calculated as follows: (t):
PULSE-ECHO A.SCAN TO VERIFY THE QUALITY OF PRODUCTS AND PRODUCTION PROCESSES
At Q.I. Composites we often deal with structures that are not produced industrially; in these circumstances, extensive analyses, rather than statistical methods, are fundamental for an objective assessment of the quality of the structure and, indirectly, of the soundness of the method of production.
Ultrasound testing turns out to be particularly effective in this respect, since it allows to acquire a potentially unlimited number of spectra from any part of the structure, without leaving any trace of the analysis that has been made.
In-depth analysis of the collected spectra, with the help of specific software and Q.I.’s experience, results in an accurate assessment of the quality of the structure according to the following parameters:
- presence of delaminations
- kind of delaminations
- uniformity of the thickness in the stratification
- compactness of fibers
- uniformity of the mechanical property of the structure
- possible inclusions of materials, extraneous to the lamination
By following the procedure described here, it is possible to supply the customer with a product guaranteed by a method of analysis based on objective and unequivocal data, like ultrasound speed, amplitude of the signal, etc… Indeed, this large amount of information, when examined in depth, can be used to drive the technological growth of both production and design.
Our approach provides a unique tool to monitor the behavior of composite structures in time, which still represents a major challenge for boat builders. A thorough knowledge of what happens to a structure after being used for a period of time is fundamental to avoid repeating the same building mistakes; but above all it gives the customer the confidence of sailing safely on a solid boat.
Indeed, if any fault is detected, this could be immediately repaired stopping its propagation.
In this respect, the most effective strategy for hulls in use involves monitoring of the same spots that were analyzed in post-production check. Comparing new spectra with the previous ones allows to point out the changes that have occurred while the boat has been used.
More specifically, Q.I. can monitor:
- variation of the mechanical properties
- propagation of pre-existing delaminations
- formation of new delaminations


